This article is Day #29 in a series called 31 Days of Mango, and was written by guest author Matt Eland. Matt can be reached on Twitter at @integerman.
Globalization versus Localization
People often get confused when discussing globalization and localization. Both deal with presenting content in a user-friendly manner across the world, but the distinction is that globalization deals with formatting elements such as times, dates, currencies and numbers in the way that the user is familiar with whereas localization involves displaying the user’s native language in the user interface. This article will cover using both techniques to build applications that can reach a large audience in the most user-friendly way possible.
We will be building a simple application over the course of this article that supports both globalization and localization. This application quickly generates an e-mail message that lets a contact know you’re running late to an appointment.
Configuring Localization Support
After creating a new C# Windows Phone project, we’ll need to do a few things to configure the application to support localization.
Defining a neutral language for the assembly
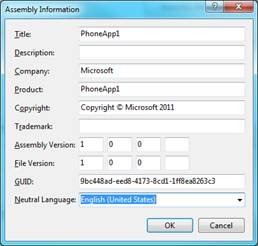
Because we’re localizing our application, we need to tell the project what the default locale is. To do this, we’ll go into the properties dialog for the project and click on “Assembly Information…” and then specify the neutral language for our assembly – that is, the language that will be used if no locale-specific resources are defined that matches the user’s locale. For this example, we’ll set our neutral language to English (United States).
Indicating supported culture
Next we need to tell the project what languages are supported. Visual Studio doesn’t currently expose this part of the project information, but we can easily edit it. Make sure you save all changes so any changes to the .csproj file are saved to disk before we edit the file. Next go to the project’s folder on the disk drive by right clicking on the project and selecting “Open folder in Windows Explorer”. Select the .csproj file for your application (be careful not to select the .csproj.user file) and open it with Notepad or your favorite text editor.
Look for the <SupportedCultures></SupportedCultures> element and add the culture codes of the cultures you wish to support separating each culture with a semicolon. This list should not include the neutral language of the assembly. See http://msdn.microsoft.com/en-us/library/hh202918(v=VS.92).aspx for a list of cultures supported by various versions of Windows Phone. For the purposes of this example, we’ll be supporting Spanish, simplified Chinese and French in addition to the default culture of English (United States) so our SupportedCultures node looks like:
<SupportedCultures>es-ES;zh-CN;fr-FR</SupportedCultures>
After making your changes, save the .csproj file and go back to Visual Studio. Click reload when Visual Studio prompts you that the project has changed so the changes to the project file can take effect.
Create a base resource file
Now that we have a default culture and a list of other supported cultures, we can start defining culture-specific resources. We’ll start by adding a file for default resources and move on to adding resources for specific cultures. As a localization best-practice, any user-facing string should be included in these files instead of hard-coded in XAML or a code file.
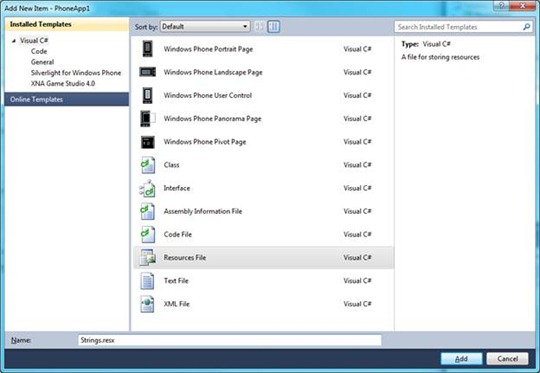
We need to add a resource file to the project that defines the default language strings for the application. To do this, we’ll right click on our project in the solution explorer and choose “Add -> New Item”. From here, we’ll add a resource file. This file can be called whatever you like, but for this example we will call it Strings.
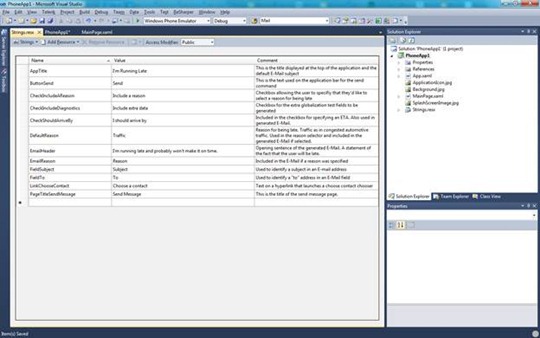
Adding the file takes us into the resource editor for this resource. The resource editor contains a table with three columns: Name, Value and Comment. Name is the auto-generated code-behind name for the resource and serves as a unique key for identifying a resource. Value is the culture-specific value for this resource and is what we’ll use to store user-facing text. Comment is not used by the application but is helpful for noting what each resource means and where it’s used and can help greatly during translation to other languages. You’ll also see an access modifier at the top of the resource editor. This is internal by default but we need to change this to public so we can bind to these values in XAML later.
Here is our example after adding the appropriate strings and changing the access modifier to public:
Create culture specific resource files
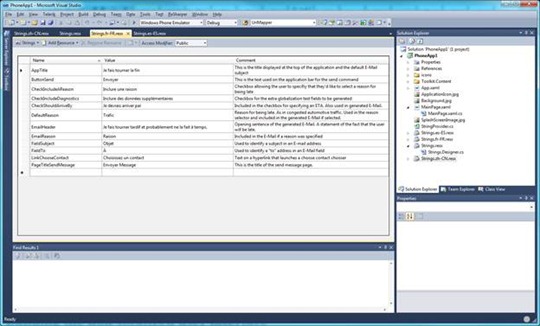
Now that we have our default resources defined, we can begin creating customized resources for the project. We’ll start by defining the Spanish resources for this application. Control-click and drag Strings.resx in solution explorer to create a copy of String.resx then rename “Copy of Strings.resx” to “Strings.es-ES.resx” (es-ES is the culture code for Spanish). It’s important that this new file start with the same name as your previous resource file but have the matching locale at the end of it or this file will not properly map to the intended locale. Once you’ve renamed that file, open up the Strings.es-ES.resx file and modify the Value column for each resource. A good source for translations is Bing Translator, though you should verify translations with someone who understands the language before deploying. It’s important that the Name column matches between resource files so that resources can be appropriately mapped.
Once you’ve finished with this, follow the same procedure for any additional locales you wish to support being careful that all resource files have an access modifier of Public, keep the same name, and contain the appropriate culture code. It’s also important to note that the resource editor may not display certain foreign character sets correctly when copying and pasting from Bing Translator to the resource editor, but these characters should look fine on the actual device and the emulator.
Building the non-localized user interface
Now that we have a set of localized strings, we’d better build a user interface that can use them. Our sample application will have a few fields, an application bar and a standard header. Because we want to include dates in this example to demonstrate globalization, we will be referencing the Silverlight Toolkit for Windows Phone and using the TimePicker control contained in that assembly. This article won’t go into detail on downloading, installing and referencing the toolkit, but the toolkit is freely available and help is available online.
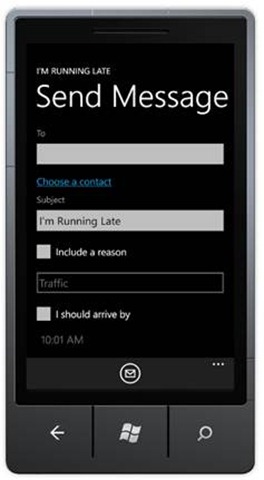
Our non-localized MainPage.xaml looks like:
x:Class="PhoneApp1.MainPage"
xmlns="http://schemas.microsoft.com/winfx/2006/xaml/presentation"
xmlns:x="http://schemas.microsoft.com/winfx/2006/xaml"
xmlns:phone="clr-namespace:Microsoft.Phone.Controls;assembly=Microsoft.Phone"
xmlns:shell="clr-namespace:Microsoft.Phone.Shell;assembly=Microsoft.Phone"
xmlns:d="http://schemas.microsoft.com/expression/blend/2008"
xmlns:mc="http://schemas.openxmlformats.org/markup-compatibility/2006" xmlns:Controls="clr-namespace:Microsoft.Phone.Controls;assembly=Microsoft.Phone.Controls.Toolkit" mc:Ignorable="d" d:DesignWidth="480" d:DesignHeight="696"
FontFamily="{StaticResource PhoneFontFamilyNormal}"
FontSize="{StaticResource PhoneFontSizeNormal}"
Foreground="{StaticResource PhoneForegroundBrush}"
SupportedOrientations="PortraitOrLandscape" Orientation="Portrait"
shell:SystemTray.IsVisible="True">
<phone:PhoneApplicationPage.ApplicationBar>
<shell:ApplicationBar IsMenuEnabled="False">
<shell:ApplicationBarIconButton IconUri="/icons/appbar.feature.email.rest.png"
IsEnabled="True"
Text="send"
Click="HandleSendClick" />
</shell:ApplicationBar>
</phone:PhoneApplicationPage.ApplicationBar>
<!–LayoutRoot is the root grid where all page content is placed–>
<Grid x:Name="LayoutRoot"
Background="Transparent">
<Grid.RowDefinitions>
<RowDefinition Height="Auto" />
<RowDefinition Height="*" />
</Grid.RowDefinitions>
<!–TitlePanel contains the name of the application and page title–>
<StackPanel x:Name="TitlePanel"
Grid.Row="0"
Margin="12,17,0,28">
<TextBlock x:Name="ApplicationTitle"
Text="I’m Running Late"
Style="{StaticResource PhoneTextNormalStyle}" />
<TextBlock x:Name="PageTitle"
Text="Send Message"
Margin="9,-7,0,0"
Style="{StaticResource PhoneTextTitle1Style}"
TextWrapping="Wrap" />
</StackPanel>
<ScrollViewer Margin="12,0,12,0"
Grid.Row="1">
<StackPanel x:Name="ContentPanel">
<TextBlock TextWrapping="Wrap"
Text="To"
Style="{StaticResource PhoneTextSubtleStyle}" />
<TextBox x:Name="txtTo"
TextWrapping="Wrap"
InputScope="EmailUserName" />
<HyperlinkButton Content="Choose a contact"
HorizontalContentAlignment="Left"
Foreground="{StaticResource PhoneAccentBrush}"
Click="HandleChooseContactClick"
Margin="{StaticResource PhoneVerticalMargin}" />
<TextBlock TextWrapping="Wrap"
Text="Subject"
Style="{StaticResource PhoneTextSubtleStyle}" />
<TextBox x:Name="txtSubject"
TextWrapping="Wrap"
Text="I’m Running Late"
InputScope="Text" />
<CheckBox x:Name="checkIncludeReason"
Content="Include a reason" />
<TextBox x:Name="txtReason"
TextWrapping="Wrap"
Text="Traffic"
InputScope="Text"
IsEnabled="{Binding IsChecked, ElementName=checkIncludeReason}" />
<CheckBox x:Name="checkIncludeETA"
Content="I should arrive by" />
<Controls:TimePicker x:Name="timeArrival"
IsEnabled="{Binding IsChecked, ElementName=checkIncludeETA}"
Margin="0,-12,0,0" />
<CheckBox x:Name="checkIncludeDiagnosticData"
Content="Include extra data" />
</StackPanel>
</ScrollViewer>
</Grid>
</phone:PhoneApplicationPage>
Obviously this XAML contains a number of hardcoded strings which is not what we want for a localizable application. We need to get the user interface to take advantage of our resource strings.
Retrieving Resource Strings in XAML
Luckily, the resource designer we’ve been working with has already automatically generated classes for accessing these resources. Unfortunately, we can’t easily bind to these in XAML because the auto-generated Strings class has an internal constructor and static properties so we’ll need to create a resources wrapper object that exposes these in a way we can bind to.
Add a new code file to the solution called StringProvider.cs and include the following code:
{
public class StringProvider
{
private readonly Strings _resources = new Strings();
public Strings Resources
{
get { return _resources; }
}
}
}
Now go into your App.xaml file and add a new resource to the application with an appropriate xmlns qualifier. This resource will be available across the entire application and will provide easy access to string localization. When done, our App.xaml will look like:
x:Class="PhoneApp1.App"
xmlns="http://schemas.microsoft.com/winfx/2006/xaml/presentation"
xmlns:x="http://schemas.microsoft.com/winfx/2006/xaml"
xmlns:shell="clr-namespace:Microsoft.Phone.Shell;assembly=Microsoft.Phone"
xmlns:local="clr-namespace:PhoneApp1">
<!–Application Resources–>
<Application.Resources>
<local:StringProvider x:Key="Strings" />
</Application.Resources>
<Application.ApplicationLifetimeObjects>
<!–Required object that handles lifetime events for the application–>
<shell:PhoneApplicationService
Launching="Application_Launching" Closing="Application_Closing"
Activated="Application_Activated" Deactivated="Application_Deactivated"/>
</Application.ApplicationLifetimeObjects>
</Application>
Now that we’ve defined our StringProvider as a resource, we can bind to it in the main page. In this case we’re binding to a sub-property on the Resources property representing the name of the resource as we defined it earlier in the resources collection and using the application StringProvider object as a binding source. For example, our page title TextBlock becomes:
Both Blend and Visual Studio’s design surfaces should recognize this binding and display the neutral language string (the value in Strings.resx) in the designer if the project has been rebuilt since the resource was added.
When building localizable applications, be aware that in many languages resource strings will be longer than in the default locale. Because of this, it’s important that you set TextWrapping="Wrap" where applicable and use flexible layout structures such as ScrollViewers and StackPanels that can adapt to multi-line content when needed. Due to potentially long resource strings, setting SupportedOrientations="PortraitOrLandscape" on the page element is recommended where appropriate.
It’s also important to be aware that not all locales support different fonts. Your best bet for application localization is to avoid manually specifying fonts or font weights and instead relying on the built-in styles. See http://msdn.microsoft.com/en-us/library/hh202920(v=VS.92).aspx for more information.
Referring to localized strings in code behind
This approach will work for most of the strings, but Metro design guidelines require the application title at the top of the page to be in all caps and our string in the resource file uses initial caps. We could define a new resource just for the title label or write a custom to uppercase value converter for the binding, but instead we’ll just set the title in the code behind so we can demonstrate accessing localized resources from code by adding the following line to the MainPage’s constructor:
ApplicationTitle.Text = Strings.AppTitle.ToUpper(CultureInfo.CurrentCulture);
Localizing application bars
Application bar elements do not presently support binding since they’re not truly customizable Silverlight content. Instead, we’ll have to manually set the text of our ApplicationBarIconButton in the code behind by referring to the auto-generated property for our resource name on the Strings resource as follows:
{
InitializeComponent();
// Ensure that the app title uses all caps
ApplicationTitle.Text = Strings.AppTitle.ToUpper(CultureInfo.CurrentCulture);
// Specify the text explicitly on the app bar using our resource string.
var button = (ApplicationBarIconButton)ApplicationBar.Buttons[0];
button.Text = Strings.ButtonSend;
// By default, we’re going to be 15 minutes later than now
timeArrival.Value = DateTime.Now.AddMinutes(15);
}
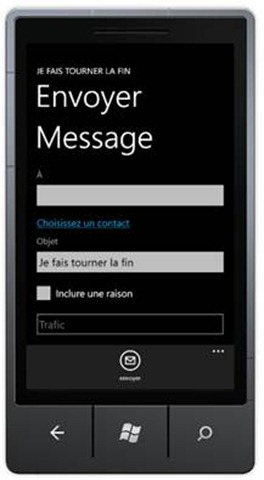
We now have a localized application. Testing the application in the emulator using French language settings results in the following:
Supporting Globalization
Now that we have a localizable application, let’s get into the globalization side of things. Since globalization deals with respecting a user’s cultural settings, it’s important to provide the correct IFormatProvider to various string formatting methods whenever appropriate. Thankfully, .NET provides CultureInfo.CurrentCulture which represents the user’s current cultural settings and can be used for formatting strings for the user interface. When doing standard comparisons or dealing with serialization or other non-user-facing operations, it’s important to use CultureInfo.InvariantCulture to ensure your app works properly in all culture settings.
Unlike localization, you don’t have to do anything to support a particular culture and the .NET framework will take care of most culture formatting operations for you. It is still a best practice to provide the appropriate format strings and specify CultureInfo.CurrentCulture as an IFormatProvider where appropriate.
For example, the code our application uses to generate an e-mail makes explicit use of the CurrentCulture and format strings:
{
// Build the E-Mail body from the user’s selections
var body = new StringBuilder();
body.AppendLine(Strings.EmailHeader);
// Include reason if applicable
var culture = CultureInfo.CurrentCulture;
if (checkIncludeReason.IsChecked == true)
{
body.AppendLine();
body.AppendLine(string.Format(culture, "{0}: {1}", Strings.EmailReason, txtReason.Text));
}
// Include eta if applicable
if (checkIncludeETA.IsChecked == true)
{
body.AppendLine();
// Since we’ve specified our ValueFormatString for the Time Picker, we can just rely on the ValueString here.
body.AppendLine(string.Format(culture, "{0}: {1}", Strings.CheckShouldArriveBy, timeArrival.ValueString));
}
// Include extra globalization examples if applicable
if (checkIncludeDiagnosticData.IsChecked == true)
{
body.AppendLine();
// this is the standardized culture name such as en-US or zh-CH
body.AppendLine(culture.Name);
body.AppendLine(string.Format(culture, "pi: {0}", Math.PI));
body.AppendLine(string.Format(culture, "number: {0}", -1));
body.AppendLine(string.Format(culture, "currency: {0:c}", 4200.00));
body.AppendLine(string.Format(culture, "date: {0:D}", DateTime.Today));
body.AppendLine(string.Format(culture, "time: {0:t}", DateTime.Now));
}
// Now that we have our message body, do something with it. What we do depends on what we’re running on.
if (Microsoft.Devices.Environment.DeviceType == DeviceType.Emulator)
{
// The emulator doesn’t currently support sending E-Mails so we’ll just output the text to a message box
MessageBox.Show(body.ToString());
}
else
{
// Compose the E-Mail and show it to the user to preview before sending
var task = new EmailComposeTask {Subject = txtSubject.Text, To = txtTo.Text, Body = body.ToString()};
task.Show();
}
}
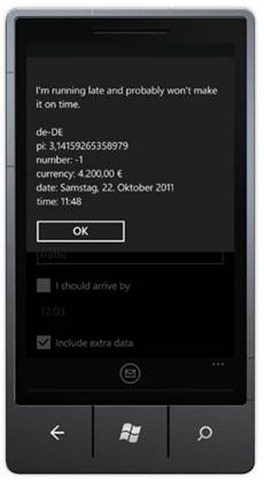
Since globalization is separate from localization, running the app in a language without locale-specific strings will result in properly globalized values such as these German settings in the image below:
Specifying format strings in XAML
Occasionally you’ll want to be able to specify a format string in XAML either as a parameter to a value converter or as a property on a built in control. In our example we’ll explicitly set the format string of our TimePicker to the short time format for the current culture (“t”). To do this, we prefix our format string with a pair of braces as shown here:
It’s also possible to set this in code behind either as
timeArrival.ValueStringFormat = "{0:" + info.ShortTimePattern + "}";
or, more concisely:
Testing for different cultures
By this point we’ve built a fully functional app that supports globalization and localization. You may be wondering how to test applications for different locales. Actual Windows Phone devices may not allow you to change your phone’s display language, but thankfully Microsoft provided this capability in the emulator.
To access these settings, go into the emulator’s applications menu on the start screen and choose the settings app. From there click on region+language on the system pivot item. 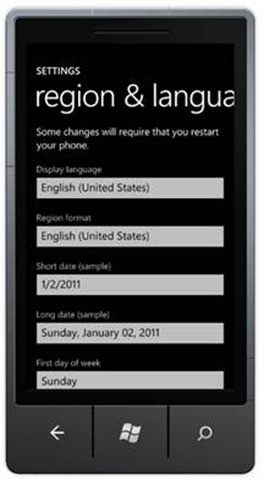
The region & language screen allows you to customize the display language on the phone by setting the Display language picker box to the language you want to test and then clicking on the “tap here to accept changes” hyperlink. Doing so will reboot the emulator’s image of the Windows Phone operating system and apply the language and globalization settings you’ve chosen. It can be confusing to use the settings pages in a language you don’t know to change regional settings so it’s a good idea to study the layout of the screen before applying your changes. Once the emulator reboots, launching your application in the emulator will allow you to verify that the app respects the user’s language and cultural settings.
Deployment Considerations
When deploying an application that supports different languages and cultures, be sure to opt-in to distribution in the markets you support either by selecting worldwide distribution when publishing your app and setting the prices or by selecting the individual locales that you explicitly intend to support.
Summary
You now know how to create an application from start to finish that will offer the best experience by providing a properly globalized and localized application to the global audience that uses Windows Phone.
To download a full Windows Phone project that uses all of the code and examples from above, click the Download Code button below.
Tomorrow, we are going back to data, and we’re going to cover how to use a local database in your application. See you then!







Leave a reply to Día 29: Globalización | La Liga Silverlight Cancel reply